03. Design Sprint Project Details
Untitled
Detailed Instructions
Untitled
A Design Sprint is a cross-functional exercise with team members participating from a number of different roles across your company (Design, Product, Eng, Marketing, etc).
In this Design Sprint project, you’ll be going through the exercises on your own and we will simulate some of the group activities related to brainstorming.
Getting Started
To get started, make a copy of the Design Sprint Starter template (Google Slides) or download the Design Sprint Project Starter template (PPT) from the Resources tab of the classroom.
You will complete each section as you go through the project.
Untitled
0. Set the Stage
You will start a PRD that can be shared with the team to set the stage about why this problem matters. The first part of the PRD will include:
- Any relevant background information
- A problem statement which communicates the scope of the problem
- Initial goals, which can continue to evolve throughout the project
Untitled
1. Understand
Create a shared understanding of the problem space and identify opportunities through a “How Might We” exercise.
- Create at least 8 virtual stickies that ask questions following the "How Might We" model
- Opportunities. Not solutions.
- Not too broad, and not too narrow
- One idea per sticky
- Get input from other members of your digital "team"
- Find the slides of How Might We stickies that correspond with your project in the Appendix of the Design Sprint Starter template
- Copy the slides into the Understand section of your deck
- Sort and group your stickies
- Group your stickies into the existing clusters or create new clusters and themes, if needed
- Feel free to rearrange existing stickies
- Pick one theme that you want to move forward with and explain your rationale for selecting that theme
L0 02 Virtual How Might We Demo
Video that demonstrates how to use the virtual stickies
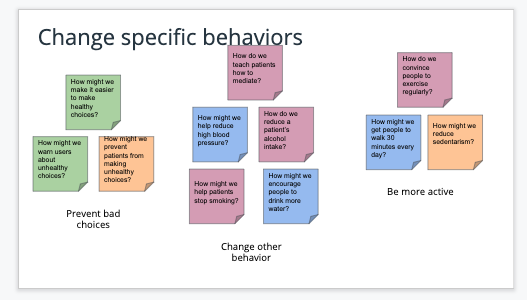
"How Might We" exercise: groups and clusters
Untitled
2. Define
By defining and focusing on the desired outcomes, you’ll be able to more clearly understand how to get there.
Write a future press review
- Think about how you want users to respond to your product:
- Who is it for?
- What problem does it solve?
- How does it change a customer’s life?
- Why should customers love it?
- Use that information to draft a review from the perspective of the user
Define success metrics (OPTIONAL) - Identify goals along with the signals and metrics that can be used to measure them using the HEART framework. This will be helpful later on, as you’ve already outlined what your project needs to do in order to be successful.
- Start by identifying at least two user-centered goals
- Then identify what signals from user behavior will affect reaching each specific goal
- Finally, create metrics derived from those signals can be measured
Untitled
3. Sketch
Generate ideas for possible solutions based on the theme that you selected.
Create 8 quick sketches to quickly generate a few ideas.
- Take a sheet of paper and fold it into 8 sections
- Sketch an idea in each of the 8 sections
- Spend about 1-2 minutes per sketch
Pick two to develop into more detailed flows that clarify how the solution would work.
- Spend about 30 minutes per sketch
- Sketch your idea in more detail than the last exercise -- use text annotations if needed
- Create at least 3 frames that show how the user progresses through the flow
- Include a title
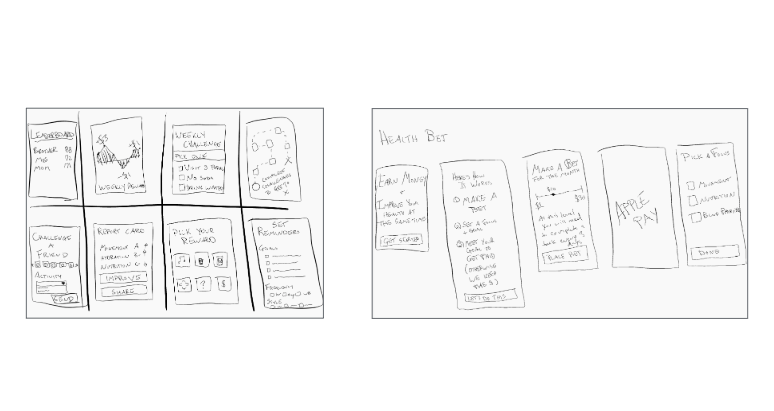
Sketches -- Quick and Detailed
Untitled
4. Decide
Pick the final concept that you want to develop into a prototype
Pick your most compelling solution sketch
Explain why it’s the most compelling
Untitled
5. Prototype
Turn your concept into a realistic, interactive prototype that you will use to validate your assumptions and ideas
Step 1. Storyboard
Create a storyboard based on your best solution sketch using either ThePlot.io or the template provided in the Design Sprint Project Starter Template. We’ll use the storyboard as the blueprint to create the prototype.
The storyboard should:
- Be high fidelity enough to build a prototype:
- Detail the steps a user goes through and how they progress from one step to the next
- Detail the layout of the software experience (wireframe level detail)
- Cover the entire user journey (ie: things that can happen outside the software experience)
- What prompts the user to use this?
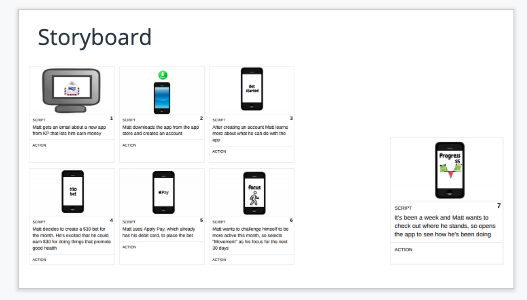
Storyboard
Untitled
Step 2. Prototype
Create an interactive prototype to showcase your concept
- Create mocks based on your storyboard using the Figma prototyping tool
- Use the prototype tool to define the flows
- Describe the concept that your prototype captures
- Describe the flows/tasks a user can complete in your prototype
Add a link to your completed prototype in your project deck.
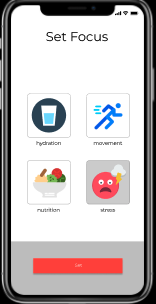
Figma Prototype
Untitled
6. Validate
Users will go through your prototype and provide feedback on your concept. This is also an opportunity to have an engineering feasibility discussion
Step 1. Create a Research Plan
- Create a research plan
- Identify your target user
- Map out the flow of the interview
- Intro
- Background information
- Tasks
- Wrap Up
Step 2. Run User Studies
Inviting users in to participate in studies is a great way to get feedback if you are on the right track. Additionally, it’s also easier to course correct at this point before any code has been written. We’re going to invite 2 users to try out the prototype that you built. You’ll use the research plan you created to guide the study and will record the audio from the session. You should also plan to take notes during the session.
- Schedule two meetings with people you can interview about your prototype
- Note: It might not be possible to find someone who meets your target user criteria-- and that’s ok for the sake of this exercise
- Run through your interview script in the research plan.
- You will ask some background questions to the participant and then ask them to complete several tasks
- Make sure to take notes during the interview (you can use the research plan as a template for notes)
- You should record the audio of the interview
- You should plan to spend about 30 minutes per interview
Step 3. (OPTIONAL) Prepare for a feasibility conversation
Now that you’ve created an interactive prototype of your concept, it’s important to make sure that it can actually be built. Engage with engineering early on, to make sure you understand the tradeoffs of how design decisions can impact timelines. Prepare to have a feasibility conversation with your engineering team or lead.
- Map out dynamic elements that are displayed in your UI
- Identify where you assume the underlying data is coming from
- List questions you have around these assumptions
- Map out what data you collect from your users (ie: text input field) and how it will be used
- Identify where you assume this data is being stored
- List questions you have around these assumptions
- Map out your expectations around latency
- Identify things that you think might increase latency
- List questions you have around these assumptions
Untitled
7. Iterate (OPTIONAL)
One of the great things about user studies is that you will get insight into how users react to your product and certain issues that they might encounter. You’ll usually want to incorporate user feedback and retest significant changes. However, for the purpose of this project this step is OPTIONAL.
If you’d like to, leverage learnings from your first two user interviews to make changes to your prototype. Then run another round of user interviews.
Step 1. Course correct
- Pick the top two issues that you identified in the previous user interviews
- Explain your rationale for wanting to address those two issues
- Update your Figma file to address those two issues
Step 2. More user studies
- Schedule one meeting with people you can interview about your prototype (not the same people as before)
- Note: It might not be possible to someone who meets your target user criteria-- and that’s ok for the sake of this exercise
- Run through your interview script in the research plan.
- You will ask some background questions to the participant and then ask them to complete several tasks
- Make sure to take notes during the interview (you can use the research plan as a template for notes)
- You should record the audio of the interview
- You should plan to spend about 30 minutes per interview
Untitled
8. Handoff
- Refine the problem and goals section (if needed)
- Complete the Key Features and Scope section
- Link your mocks to the PRD
Submit Your Project!
When you have completed the project:
- Remove all reference slides from your project deck
- Save your presentation as a PDF
- Submit it on the next page.